This post contains affiliate links. We may earn money or products contained in this post. Please click my disclosure policy to learn more.
Beginners Watercolor
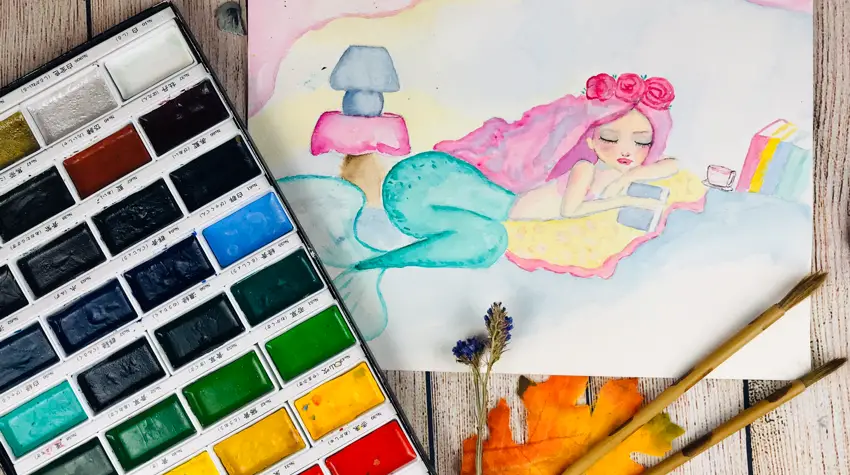
Watercolor painting is an unexpected journey. Watercolors can be unpredictable and that’s in part what makes them so magical. There are as many different ways to paint with them as there are artists.
Watercolor can seem crazy confusing when you’re just starting out. There are all types and brands of watercolor, papers and brushes. Time-lapsed videos of watercolor paintings make it look deceptively easy
The truth is, watercolor can be easy, but also tricky. Sometimes I see people get discouraged quickly because the paints don’t cooperate and the struggle is just all too real.
However, watercolor doesn’t have to be a struggle and you can grasp the fundamentals without going crazy. Once you get started and with practice you’ll soon be creating beautiful works of art.I truly believe that if you’re reading this YOU can learn to paint with watercolors and make wonderful paintings.
The key to watercolor is breaking it down and using the right supplies and a lot of practice and patience. You wouldn’t try to shovel snow from your driveway with a rake. It’d be a disaster and make the job feel impossible. Same with watercolor, the right tools make all the difference. Let’s learn about watercolor supplies
In this article we’ll cover:
- Paints
- Papers
- Brushes
- Techniques
Watercolor Paint
If you’ve looked around you’ve probably seen watercolor that comes in pans, tubes, and even liquids. How do you decide what’s right for you?
Part of choosing the right paint depends on your particular paint personality. The other part is buying quality. You don’t have to spend the big bucks on the top quality lines, however, you don’t want to buy so cheap that the paint is more of a headache than a treat. Poor quality paint can actually work against you.
If you are new don’t make things harder than they have to be.
Cheap watercolor paints are made with lower quality pigments and will contain fillers, sometimes white paint will even be added causing your colors to look dull once dry. The lightfast rating will be lower as well.
The cheap $5 watercolor paints you can find at Michals are not something I would suggest for a new artist. They are chalky, the colors kinda suck, and they don’t blend well. I’ve seen it said a great artist can make a great painting with crap supplies. Yes, that’s true. And, that’s because they have experience with the mediums so they know how to work around the negative aspects of the cheap supplies. If you’re just starting out give yourself a break and get something that will actually work with you and not against you.
Things to keep in mind when purchasing watercolor is the quality, student vs professional. The lightfast rating, transparency, and granulation.
The main differences between student and profession or artist grade watercolors are, lightfastness, fillers, pigment loads.
Watercolor Factors when choosing your paint
High quality watercolors will be made with high quality ingredients and have higher amounts of pigments.
When you look at tube of artist grade paint you will see a letter number combo and a lightfast rating. Some brands will also include. rating fro how opaque the paint is, as well.
High quality watercolors are not made with a bunch of fillers. Lower quality paint will have fillers and even white paint added to it to make it go further and lower the cost. The result of this is that your color quality will be compromised. You will also have to work a lot harder to create vibrancy and the level of color on the paper.
Also, the general look of the paint will also be affected. Think of hair when it is freshly dyed, how rich and full of depth and color. Then think of hair when the color has faded and is long over due for a touch up. It is faded and pale and has lost its luster. To me, that is the difference between high quality paint and low quality paint. Let me say one more time, there are cheaper brands that still put out great paint. I’m not a complete paint snob. However, these cheap paints still have fillers and less pigments. Lower quality paint will also be made from several pigments altering the tone of the paint.
Some cheap paint does not even list the pigments on the package. If it doesn’t list things such as pigments and lightfast ratings then you cannot count on it being lightfast.
When it comes to pigments, lower quality will result in dull colors and will affect how the paint spreads and reacts on the paper. It can spread to thinly and lift too easily.
Watercolor Binders
A good watercolor will be made will good binders lower quality paints will be made with synthetic binders and sub standard binders.
If you have a low quality binder the paint pigments can smear right off the page. That is just not cool. The way the paint blends and spears will also be affected. Lower quality binders will mean the paint does not spread out evenly, it can have harsher edges, and they will not blend as well. This is why I suggest avoiding low quality paint.
Good quality pigments and binder combination will mean you the paint will blend and not have patches of splotchiness.
Watercolor Lighfast Rating
Lightfast rating lets you know how the color of your paint will hold up over time. There are some colors that do not have a good lightfast rating no matter what brand do to the nature of the color. Neon colors opera rose, violets have low light fast qualities. Colors that are made from earth pigments such as minerals, rocks, and gemstones.
Lightfastness is the rating to determine how the watercolor fades. Some pigments naturally fade quicker than others. Low quality and student grads tend to have a poor lightfast rating.
Popluar Brands for watercolor students that are affordable, yet still good quality are:
- Prima Confections The Classics
- Paul Rubens 24 color set
- Van Gogh Watercolors
- Daniel Smith Introductory Set
These sets are going to come mostly with the primary and some basic colors like browns and greens. If, however you’re like me and you want more whimsical and vibrant colors such as pinks, purples and teals here are some of my recommendations.
My personal recommendations for watercolors
These watercolors are my personal favorites. They are on the professional side and may cost more and are an investment to your watercolor adventure.
Student Grade Watercolors
Jane Davenport watercolors are some of my favorite. She has three palettes of super fun and vibrant paints. These are a good quality, and fun to work with
What I love about them is the vibrancy of color, how easy they are to work with, and the adorable tins they come in. They also layer very well, which is one of my favorite aspects about them.
The Neutral Palette has skin tones already mixed up for the most part. It gives you a nice base to work on. I love mixing my own skin tones, and I also love have a good premixed base.
The bright palette is super vibrant. I especially adore the blues and pinks.
She has a third palette, which is the Glitz Sea palette and full of fun rich blues and greens along with some other primary colors.
If you’re just starting I recommend the Bright and Neutral palettes. They have plenty of colors to create skin tones, landscapes, and whimsical paintings. The paint is easy to use, blends well, most colors have a good light-fast rating and their easy to travel with.The great thing about these palettes is that you can buy the ones that fit your color preferences. They travel well, and they won’t break the bank.
Professional Grade Watercolors
Mejillo Mission Gold

I would say these paints are of the same quality as Daniel Smith, however, you can more colors for your money.
They paint beautifully and they have a very good lightfast ratings. The colors that come in the palettes are a perfect combination for you create pretty much anything you want.
Kuretake Gansai Tambi
Kuretake Gansai Tambi are a super amazing Japanese set of watercolors. I adore these paints so much, they make painting such a happy endeavor. There is so much misconception over these paints I have an entire article devoted to them which you can read here Kuretake Gansai Tambi review.
Basically, the 36 color set is perfection. It comes with really big pans of paint. The paint is luscious and smooth and paints like a dream. They can be slightly more opaque is you paint heavy.
You can mix beautiful shades of skin, you have bright colors, a decorative box. I keep my set at the ready at all times.
M. graham
M. Ghraham comes in tubes. You can get them in a this lovely set. These are high quality professional paints. We’ll look at the difference in a moment. This paint is top quality. They have a good lightfast rating, the colors are a dream. They mix well, the colors dry so pretty. If you don’t mind paying a little more this paint is well worth your money.
Daniel Smith
There is no way you can be into watercolor and not here this name mentioned often. This is pretty much king of the watercolor. They have every color you can dream of, the color pigments are rich, all the ingredients are top of the line, not full of a bunch of fillers. A true must, but you can wait, or buy a color one at a time and build your stock.
Here are some sets to help get you started:
If you found this tutorial helpful buy me a coffee and help support this blog.
So, let’s look at the types of watercolor Pan vs Tube
When I bought my first set of watercolors. They came in little tubes. I was so confused on how to use them. I’d only had professional lessons with acrylic and oils. I’d seen pan watercolors, but never tubes. The set was a beautiful Japanese set and I knew I needed it, just didn’t know how to use it.
YouTube was not a thing and I was embarrassed to ask around. So, my first adventure into watercolor did not go so well.
Pan watercolors have the paint portioned out for you. They are dried and must be activated with water to use them.
Tube watercolors are soft and you can either create a palette by buying a palette and squeezing tube paint into the pan and letting it dry. This is how I use my Graham and Smith paints. Some colors will stay a little moist. This is due to their composition and it’s supposed to do that, so don’t worry.
With tubes you get a lot of bang for your buck. You can also sneeze paint right from the tube onto a surface and paint from it, but I don’t recommend it. You should portion them into pans to avoid waste and control how much you use.
Building palettes is one of my favorite things in life. With tube paints you can buy the exact colors and mix and match brands all into your palette.
Brushes
Brushes really do matter. Watercolor brushes can be pricey, but here are some good finds on the internet.
Never buy brushes that are not watercolor specific. These brushes will not handle the combination of paint and water on the brush the way they are supposed to. Once you e learned a thing or two you can manipulate some of these brushes, but it’s still a struggle, don’t struggle buy brushes meant for watercolor.
Also, the $5 set from Artist Loft at Michaels is crap. The hair comes out on your page and will make you cry. I learned the hard way, just don’t.
So, when I first started I thought I need to buy $50 brushes. However, I didn’t have a budget for $50 brushes. So what did I do?
I went to the artist I admire and looked at the brushes they were using in their tutorials. Some used super expensive brushes while others used so really, really affordable brushes. I purchased several sets and got to work trying out different brushes.
My favorite set is the Grace Art Set. This comes with both round and flat brushes. I pretty much paint everything with round. You also get different size round and flat brushes so you experiment with a variety.
Flat watercolor brushes
Flat watercolor brushes are great for washes, bold lines, and edges. They can create marks with a single bold stroke.
Round Watercolor Brushes
Round watercolor brushes are great for details, for softer edges. I uses these brushes for painting skin tones on my girls, for hair, and soft washes.
Chinese Calligraphy brushes for details
These are some of my all time favorite brushes. I first found out about these from watching one of my favorite YouTube watercolor artists. I promptly ordered them and tried them out.
They work wonders for details and lines.
Plus, they look really pretty and come in a beautiful box.
They are long, the bristles are great quality, and they paint beautifully. The price is easy on the wallet and won’t break the bank, and added bonus.
Mop Brushes
This brush is actually made from squirrel hair. The other brushes are all synthetic.
The wonderful thing about this brush is the amount of water and paint it can hold. This is great for large areas, and washes.
Silverbrush
If you have the cash then you should get one some Silverbrush watercolor brushes. They are made from real squirrel hair and are pretty much top of the line. You’re going to swoon with these babies! I can’t exoress how a great brush makes painting so much easier. There’s less fighting with the lines and brushstrokes and a whole lot more joy.
Brushes make a huge difference. The way they hold paint in the bristles and they way it mixes with water and the way the strokes go down in the paper.
Here are links to my brush recommendations:
- Grace Paintbrush Set of 12
- silverbrush susan louise moyer basic silk painting watercolor brush set is 3-piece set
- Silver Brush Black Velvet Flat Brush
- Paul Rubens Squirrel Hair Mop Brush
- Chinese Calligraphy Brush
Speaking of paper let’s look at some good and bad paper
Watercolor Paper
Watercolor paper comes in different grades. It can be made from pulp or cotton and it comes in either, cold press, hot press, or rough. It’s talked about in pounds, which means pound of pressure used to make it. Never up anything under 140 pounds.
Pulp is lower quality. It’s useful to practice on, though the paint will react differently on high quality paper.
For me, I’d almost rather lower quality paint and higher quality paper. It wasn’t until I bought some decent paper that my paints really did what I wanted them to do, what I saw them do for others on tutorials and YouTube. I’ll talk about this paper more as we go.
Watercolor paper types and grades
Cold pressed is means there will be some texture to the paper.
This paper will absorb pigments better than hot pressed. The fibers are not as close together as hot pressed paper allowing for absorption.
Hot press will be smooth paper
This paper is very smooth which has the affect of paint and pigments sitting on top pf the paper. This paper works great for details and if you want to use pens and other inks. I do use ink on Cold pressed, too. It’s just way smoother on hot pressed. I always suggest people get a pad of each s they can see how their styles works with each.
You can listen to me talk all day about it, however, once you try it for yourself you’ll really have an idea of what I’m talking about. You’ll also see what paper your style favors.
Rough will have a lot of texture.
Your pigments will really absorb into this paper. If you wish to make paintings with glazes and create textures this is the paper for you.
Watercolor paper pads made with pulp
The most common paper you will see is Stathmore. It comes in different series, basically levels. I know people find success with this paper, but I sure didn’t. I was new, trying to experiment and do you know what this paper did to me? It fell apart. It couldn’t handle the water. I now use the paper in an upcycled journal where I collage over it. I never like to waste paper. You can read about How to Make Your Own Art Journal..
Many people love Canson Watercolor Paper. I do love their mixed media paper. It’s cheap, and decent quality. I have t tried their watercolor paper, whoever, several artists I know and trust use is regularly.
Another option is purchasing a really great watercolor journal. You get a ton of paper and you can bring it with you wherever you go. You can Skitch out and paint all your ideas and plan out your paintings. There is a special type of joy that comes when you fill up an entire journal. I think every artist, very personal, should keep an art journal. You can read more on Why You Should Start an Art Journal You can also read How to start an Art Journal.
My watercolor journal recommendations are:
Now, for the top of the line brand, Arches.
They have earned every bit of their reputation. This is the paper they let me know I could make beautiful watercolor. My paint went on the paper the same glorious way I say the paint on Youtube videos go on. Oh my heart! The paper really isn’t that much. You can even cut your pages in half to get more.
If you live by a good art supply store you can buy single sheets. You can also buy the higher grades such as the 300, and 400 pound paper. Every watercolor student deserves some good paper. Here’s my intro shopping list:
A Good Watercolor Set
Grace Brushes
One Journal for practice
Arches Cold Press 140 pad
Okay, so those are the supplies, now let’s look at some helpful tips.
Watercolor Basics
One, do not paint directly from the palette.
There will be times when you may want to paint from the palette. But only for certain effects.
Painting from the palette will create dark, opaque colors. It tends to look harsher and you loose the translucent, watery look of the paint.
Instead, load your brush with paint and lay it down on your mixing palette. There you can add water to create the desired density of paint.
Always have two glasses of water. One glass for cleaning, and one glass for adding water. If you use on glass of water you are going to end up with some muddy colors mixing in with your desired colors.
Keep paper towels or rags nearby. You need something to dab your brush and maybe even something to lift paint from your page. I prefer paper towels to rags, I find rags can be too harsh on the paper and can leave little traces of fibers.
Use brushes designed for watercolor. As mentioned earlier, bristles made for watercolor are completely different than other paints.
Swatch your colors. When you first buy your watercolor swatch the colors as the paint will look different in the pan or tube versus on the paper. I like to do a graduation so I can see the various shades I can get with one color.
Plan out your palette and swatch your mixes.
Let layers dry to prevent mixing where you don’t want it. If one section of your painting is not dry and you paint alongside it you do risk the two colors mixing, sometimes this can be a desired effect, though.
Tape your page down to help prevent warping. Watercolor paper can warp and buckle, especially if you are doing a wash or use a lot of water. Taping down your paper prevents this or makes it very minimal.
Do not use heavy erasers on watercolor paper. It can hurt the paper and leave it damaged and this will affect the way the paint goes on. If you need to erase gently use a kneaded eraser and then use a dry paintbrush to sweep away the debris.
Build on layers light to dark. With watercolor you can not go back and make something lighter unless the paint lets you loft what has already been laid down.
Watercolor Techniques
Wet on Wet
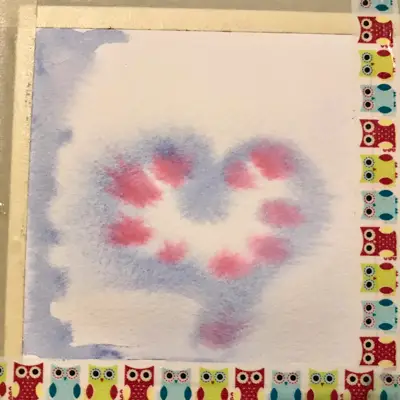
Wet on Wet is where you wet your page or the section of your page you intend to paint and your paintbrush is also wet. This gives a soft look and it’s easy to blend.
The paint will only go where you have placed the water. You can add lots of water and dip the paint and let it do vein out. You can use light water for more control.
Dry on Wet
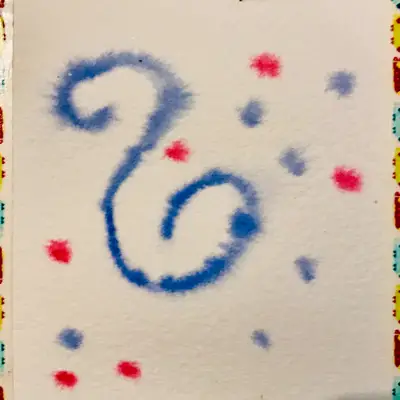
Dry on wet on Wet is where you have a lot of paint and little water and your painting on wet paper. You’ll get the nice bleeding and soft edges of the wet on Wet, however, you’ll have more control and less of the feathered edges.
Wet on Dry
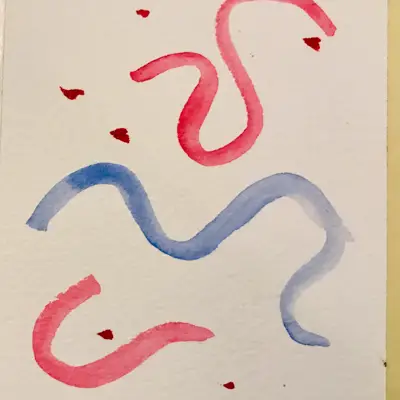
Wet on Dry is where you have a wet brush and you’re painting on dry paper. You can achieve very fine edges and have a lot of control.
You can easily achieve darker, bolder colors very quickly with this method.
Dry on Dry or Dry Brush
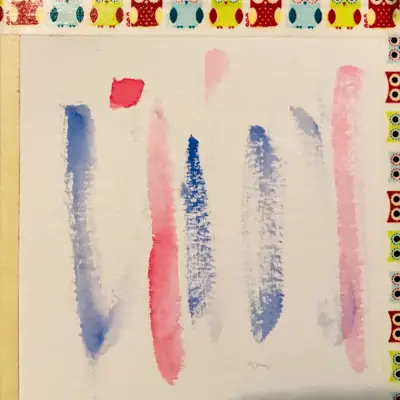
This is where you are using a mostly dry brush (since you’re using watercolor there will still be some water present) on dry paper.
This method is great for adding details as you have control over exactly where the paint goes. You also can get interesting texture
Did you find these tips helpful? Buy me a coffee and support me blog. ❤️
The next article will focus on washes such as flat washes and gradual washes, so be sure to check back.
Watercolor Tutorials and Free Online Classes
I’m working on more watercolor tutorials. However, I do have a special gift for you! Have you heard of Skillshare? It’s an on-line community of pretty much every class on every topic. It’s kinda like a streaming service, think Netflix but for super amazing classes. I’ve been a member for about six months. I’m always watching classes on some new art technique. They have loads of fantastic watercolor classes. They are for all levels. So, if your brand new you’ll find something that suits your needs. You can follow this link to get your first month free.
Here are some of my favorite classes that I recommend, especially for beginners. Just click on the image below to head over to Skillshare and start your trial. It truly is free for all their classes for your first month. You’ll have TONS of time to go through classes. My personal favorite aspect about these classes is the pacing. They are broken down into easy sections so I don’t have to do it all at once.
I also love to give hands on help. You can join my Facebook Group. I’d love to help answer any questions you have!


Can’t wait
Great read. You forgot to mention the most important tool. Patience.
Overwelming info. I have only done oils from u tube and would like to try watercolor. Very very beginner in painting. Which beginner course do u suggest. I have a few 3 watercolor brushes unopened. Mary OppeltMary