This post contains affiliate links. We may earn money or products contained in this post. Please click my disclosure policy to learn more.
How to paint a watercolor galaxy
Let’s get galactic! The beauty of watercolor paints is that they can be so fun to paint with and so easy to create beautiful paintings. To create a watercolor galaxy and a beautiful starry night sky all you have to do is add water, a few colors and VIOLA! You have a beautiful painting. Creating a watercolor galaxy is fun and addictive. There are so many ways you can paint one and so many things you can do with it once it’s painted. Let’s break it down so you can start ti create your own versions.
Supplies
- Watercolors
- Watercolor paper
- Paintbrush
- White gel pen or white acrylic paint
Watercolor
I used my Kuretake Gansai Tambi watercolors. I adore them. They are super affordable and they are truly beautiful watercolors that are made in Japan. You can read more about them in my review post here. You can use whatever watercolors you have.

Watercolor Paper
I used Arches Cold Press paper . My paint cooperates and looks the best on this paper. It can also handle large amounts of water. Another good option is Canson watercolor paper. It’s not quite the same quality as Arches, but its not bad and it can look amazing. Many Youtube artists actually use this paper quite often in their tutorials. Its a great paper and super affordable.

Watercolor Brushes
I use Grace Art Brush Set for pretty much everything. They are amazing brushes and again, super affordable. For this project you really don’t need anything else. If you already have brushes grab a larger round brush. The one I’m using is a 12. This is just what works for me and what I find to be the easiest. Never be afraid to experiment.

White Gel Pen
I use Uni-Ball Signo Broad white gel pen
to add white detail. I adore this pen. Of all the white pens I’ve used this is by far the best. It comes out a very strong white and actually dries vibrant. It writes on almost anything.

White paint for the stars
Paint to make the stars. You can use a white gel pen, however, you won’t get the splatter effect. To get the splatter effect you need white acrylic paint or white gesso. I use Liqutex White gesso.

Now, lets get to painting our watercolor galaxy.
Step 1
Tape down your paper. I you have a drawing board perfect. If not you can use the hard cardboard on the back of sketchpads or clipboard. Basically, you need a sturdy, clean surface. I use Washi tape to tape down my paper. You can use masking tape or painters tape. Before you stick the tape on your paper try sticking it on your pants to remove some of the stickiness so it’s easier to remove from your paper once youre done painting. You don’t want it taking off any of the paper itself.
Step 2
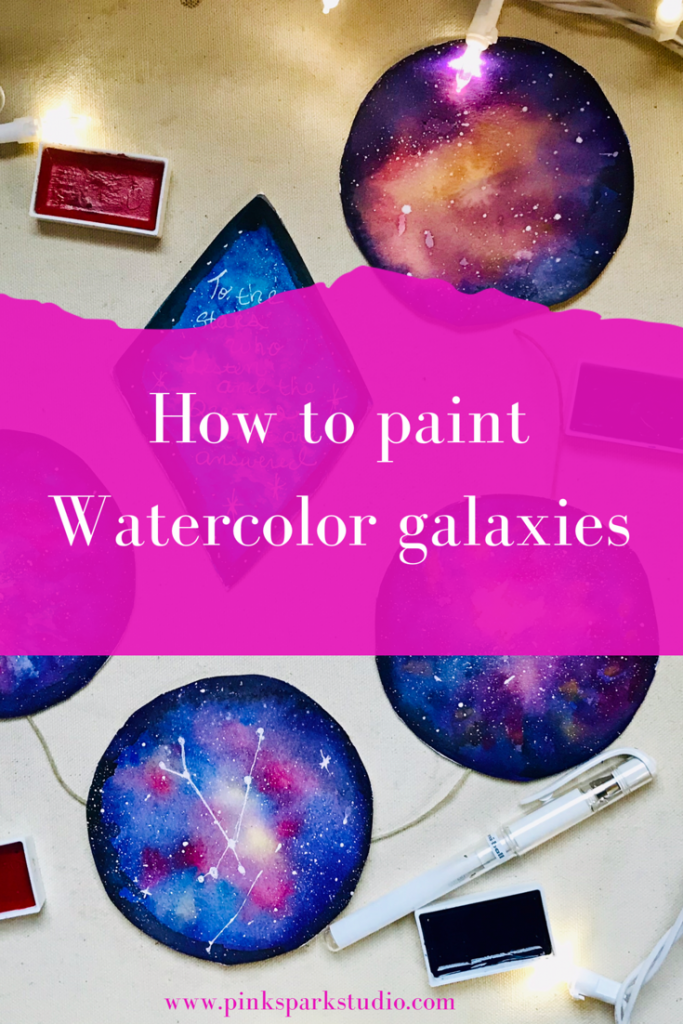
Choose the shape you want to make your galaxy. In this article I choose a circle. However, you can paint the entire sheet of paper or choose any shape that you desire. Painting a watercolor galaxy should not have limits, have fun with shapes and designs.
I traced my shape out with a black Micron Pen. I use this pen because it is waterproof and writes so well.
Step 3
You’re going to want to wet your paper. Wet, not drench. I can be a little heavy handed when it comes to adding water. You want to have enough water that it makes the paint easy to blend, but not too much that it creates large pools of water on the page. If you do add too much water try blotting it with some paper towel. Don’t rub because you can image your paper that way.
Step 4
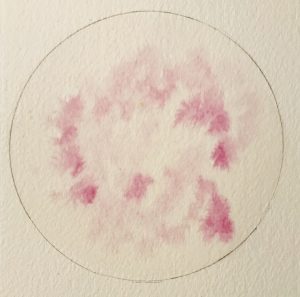
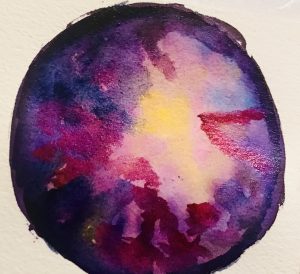
This is the fun part! Here you can start adding color to your galaxy. You can mix so many different color variations to make galaxies of all types. The only think you want to be careful about it not to create muddy colors. The good thing about galaxies is generally the colors used to create them blend very well.
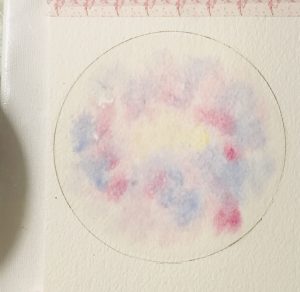
So, for this galaxy I started with a reddish maroons color. I tap the brush with paint and let the water on the page carry it out. Then, sometimes I will swish it around to get loose shapes and blend it with other colors. I add light blues. In the center of one I added a nice bright lemon yellow to another a mint green.
Step 5
Generally, leave the center for either white more white space or for your lightest, brightest colors.
You can swirl in some darker colors, but let the light in the center shine. Let the colors swish with each other and create loose shapes.
I also take some of the light/bright colors for my center and add then around to spots on the galaxy to help give the illusion of many layers of light.
Step 6

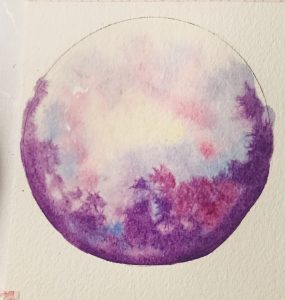
Add more colors if you want. Add the darkest colors on the outer edges. I generally use deep purples and blues such as cobalt purple and cerulean blue.
You want to mix the colors on loose shapes so the mix and mingle without blending too much. Thats why I like to use reds, purples, and blues. You can see the individual color and where they overlap they blend in a very nice way. These colors don’t muddy. The Kuretake Gansai Tambi set I use is really good at not creating muddy colors .Another reason why I love them so much.
Step six 7
These steps are really loose, you may have already created a blend of colors you like and are ready to stop painting. There are no hard and fast rules with painting galaxies. Keep experimenting.
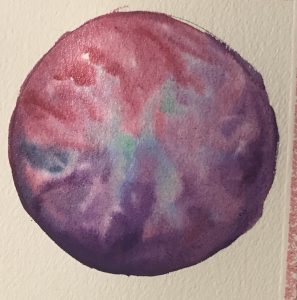
Now, you can make the edges as dark as you want. OI often add black. I like the look it gives and how it makes all the lighter colors pop. I also let it dry a little and touch up spots with more color of I think it needs it.
Step 7
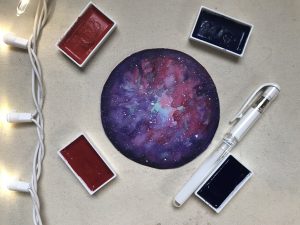
Time to add the stars! I love this part. What I do is take a toothbrush or a firmer brush, dip it in white gesso or white acrylic paint and then flick the bristles onto the galaxy. I get close and move away to get bigger and smaller specks of white. Be careful not to load too much paint. I have been known to do this and a giant blob of paint will fall onto my galaxy.
It’s totally fixable. I just dab it up with a dry paper towel. And once dry lightly add some watercolor on top. Not too much because the white paint will bleed.
You can stop here and admire your galaxy or keep going for more ideas.
Step 8
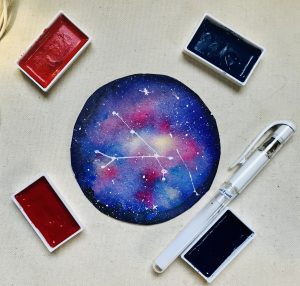
I use my uni-ball Signo broad white pen to add more stars individually. I can’t say enough how much I adore this pen! I’ve used Gel roll white pen before, and I like it, but this Uni-ball is way better in my opinion. The white comes out super white the first time.
You can also use a white fine point Posca pen as well.
You can also draw on constellations. Here I did the constellation for Aries. You can make them large or small. You can paint several constellations on one galaxy or make one really big constellation. The choice is yours, have fun with it.
Step 9
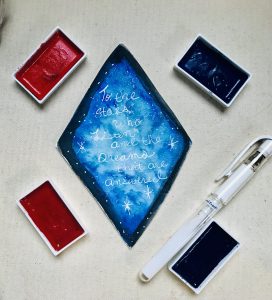
You can also use a white pen to write words. Here I wrote a quote from a recent book I read.
Step 10

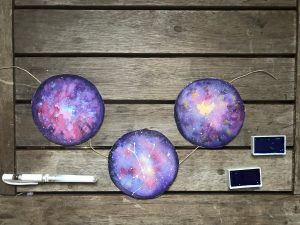
Cut them out and make decorations.You can take your beautiful watercolor galaxies and make decorations. They look beautiful hanging one your walls. You can also Fram them and give them away as gifts.
Get creative
Once you have an understanding of how watercolor galaxies work. You can create beautiful watercolor starry skies. You can paint galaxies into any shape. You can take black paint and add silhouetted shapes.
Let’s be friend! I’d love to your art and answer your art questions. Join my private Facebook group and talk art with me.

If you found these tips helpful buy me a coffee and support my blog.
Leave a Reply